Inside Out and Back Again Images of Page 5-7
Use HTML and CSS to Build a Photo Gallery
In folio one of this tutorial, How to Marshal Images in HTML, I gave you lot the basic codes for putting graphics on webpages. At present, here's a template to make a multi-image gallery of pictures side-by-side.
This volition piece of work on platforms similar Wordpress that let you toggle "lawmaking" and input HTML directly. Note that many web publishing tools now take photo gallery widgets or other plugins that accept care of this task for you, but at present and and so, we still find ourselves needing to hand-lawmaking.
Before Nosotros Begin: You lot Need Images!
Before you go whatever farther in this tutorial, you must have images uploaded (stored) somewhere on the web, and you must be able to provide the address (URL, location) where each image is stored. In that location are various options for hosting images:
- A weblog. If you lot accept a blog, information technology should accept a media or image folder where you lot can upload those images.
- Photobucket. This is the most common solution.
- TinyPic is another complimentary image host like Photobucket.
If you view your image gallery or library on the site where you've uploaded it, you lot'll probably see a line that tells you the image'south location (the URL) where it is stored on their site. For instance, Photobucket has a box listing the paradigm'south "direct" link.
If yous tin't find a box like that, then right-click (command-click or Ctrl-click) an prototype and cull "copy image location" or "re-create image URL."
Finding the URL of Your Paradigm in Photobucket
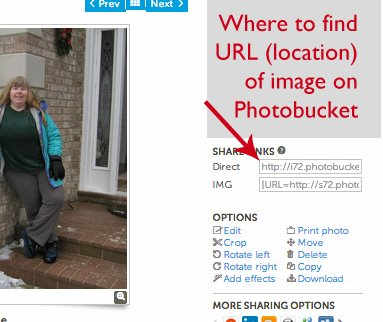
from my Photobucket Library
HTML / CSS Codes to Tile Images
For every prototype in the gallery, use the code below, replacing "imageLocation" with the URL of a photo you've uploaded somewhere on the web (in quotation marks).
<img src="imageLocation" style="float: left; width: 30%; margin-right: 1%; margin-bottom: 0.5em;">
Echo this clamper of lawmaking for each image, without skipping lines or spaces between the chunks. (I repeat: in each example, you will be replacing "imageLocation" with the URL of the photo you lot are placing.)
Of import: Subsequently your very concluding image, add the following code:
<p style="clear: both;">
That means, "Terminate tiling left to correct. No more floaty images. We're starting on a new line, hither." Otherwise, the text beneath the prototype gallery might try to crawl up into the space to the correct of it. Usually at that place's not enough room, but information technology's all-time to close the gate to brand certain.
Caption of codes:
Ringlet to Continue
Read More From Owlcation
- img src="blah" is the placeholder for "Stick an image here. The source (location) of information technology is...". (Your image's URL replaces the word apathetic.)
- style ="apathetic" means "And here'due south how I want it to brandish on the folio." Mode is also used for font colors, sizes, and anything to exercise with layout or advent. (The line of code I gave you already says how you want the image to be displayed.)
- float means "squeeze the moving-picture show every bit far to the left as it volition fit; if in that location'southward not plenty line, wrap around until in that location is room." Basically, information technology makes a graphic behave exactly the way a letter of text does when you type it on a computer screen.
- width specifies the image's width. 30% restricts its width to 30% of the column. If yous string a agglomeration of pictures together with float, and they're each 30% of the available space, they'll wrap around later on the third image on each row.
- margin-right is the whitespace to the right of each graphic. Since I don't know how wide your device'due south screen is, I made the margin 1%. You can play with this number if yous need to.
- margin-bottom is the whitespace below each graphic. Because webpages can coil off the bottom of the page, we tin't actually specify vertical layout in percentages, so I cheated and specified the vertical space in ems. An em is the width of the alphabetic character m. Like percentages, ems grow and shrink depending on screen size, whereas pixels are stock-still. Three pixels on a mobile phone take upwardly a lot more screen real manor than three pixels on a large figurer monitor.
To Identify More than Than Iii Pictures Side-by-Side
What if y'all want to tile more than iii across? Then information technology's time to practice math. Divide 100% by the number of images you desire to tile across. That gives you lot the width of the image AND its margin-right. Now decide how much of that amount you want to be image, and how much you want to be margin.
Information technology's all-time to fold in a fiddling extra wiggle room, just to brand certain.
For example:
- Iii images across: thirty% + 1% times 3 = 99%.
- 4 images across: 23% + 1% times 4 = 96%.
- Five images across: 19% + 0.v% times 5 = 97.five%
Why am I bothering with wiggle room? Considering I've found that some idiot browsers act similar in that location's an invisible one-pixel-broad edge around images, making images fractionally wider than what we've specified.
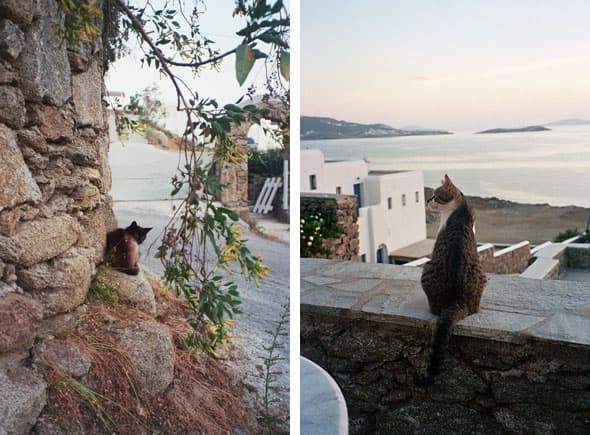
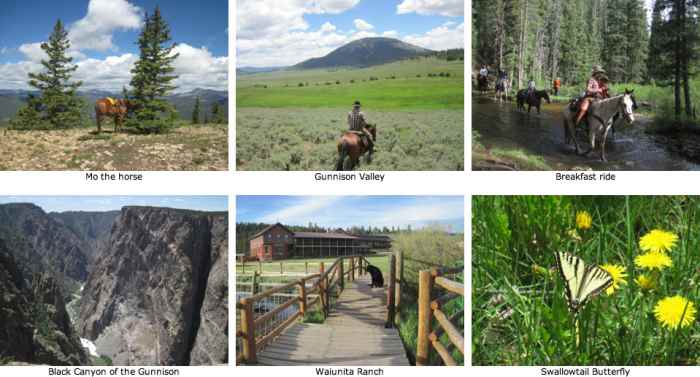
Case Side-by-Side Prototype Gallery
All photos from my trip to Gunnison, Colorado.
© 2022 Ellen Brundige
Making the Images Into Clickable Links
Each image can be a clickable link. Sometimes this is useful for menus!
Wrap the following code around each image'south code:
<a href="URL"><img src="imageLocation" style="bladder: left; width: 30%; margin-right: one%; margin-bottom: 0.5em;" ></a>
Replace "URL" with the URL of the page you want the image to link to (but go on the quotation marks). (Copy it from the Location bar at the tiptop of your spider web browser while viewing that page.)
Multiple Image Photo Gallery With Captions
This Is a Niggling More Tricky.
What if yous want each photo in your epitome gallery to take a caption? Well, oddly enough, in HTML lawmaking, we tin can say, "Treat a paragraph equally a box." And and then we tin can tile those boxes side-by-side simply like we did the images in the examples higher up.
Inside each box can be an image plus a caption.
And so, for each image and its caption, use the following chunk of lawmaking:
<p style="float: left; font-size: 9pt; text-marshal: center; width: 30%; margin-right: 1%; margin-bottom: 0.5em;"> <img src="imageLocation" style="width: 100%">Caption</p>
Replace the imageLocation with the URL of the image, and the Caption with any text you want. If the text is too long to fit on 1 line, it'll wrap effectually.
Repeat that code chunk for each "box" — the paradigm plus its explanation— without skipping lines betwixt the chunks.
Finally, to close off the side-by-side image gallery, put this at the end:
<p fashion="clear: both;">
Once again, if you need to have more three side-by-side images across, then divide 100% by the number of images you desire in a row to get the width of the image plus its margin-correct, and then allocate most of that amount to the image's width and a fiddling flake to the margin. But again, it's best to give it a little jerk room (web browsers are often stupid), then peradventure commencement with 99% instead.
And if you want to brand something a clickable link, just wrap <a href="URL">[thing]</a> around it. [thing] can be any text in the caption, or information technology can be an image, in which case [matter] is <img src="....">
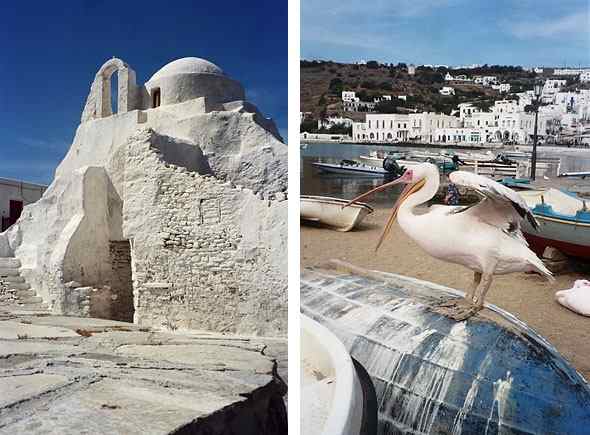
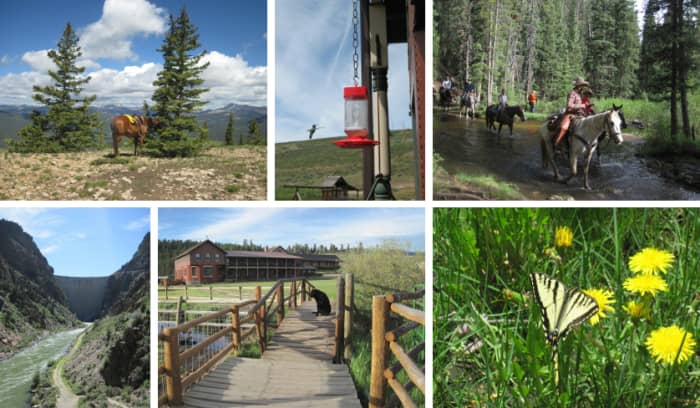
Side-past-Side Images With Captions
© 2022 Ellen Brundige
Further Tweaks and Tips: More Photos, Clickable Links
Again, if you want more than 3 side-past-side images across, then split 100% (or peradventure 99% to allow wiggle room) by the number of images you desire in a row, to summate the width of the image PLUS its margin-right. And so allocate virtually of that amount to the paradigm'southward width and a little flake of information technology to the image's right-hand margin.
If y'all want to make something a clickable link, but wrap <a href="URL">[thing]</a>around it. [thing] can be whatsoever text in the caption, or it can be an image, in which instance [thing] is <img src="...." style="...">
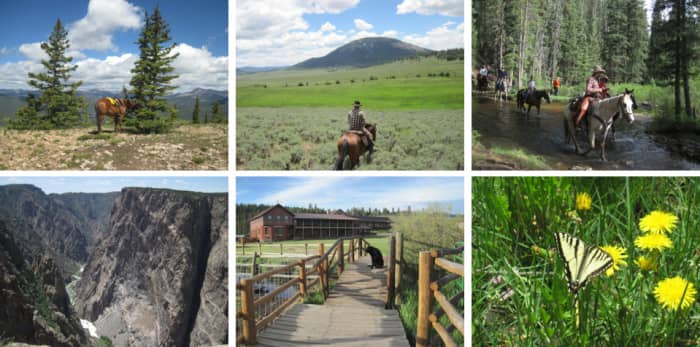
Images of Different Dimensions
© 2022 Ellen Brundige
How To Make a Gallery of Images of Different Dimensions
You may have noticed that in the balance of the examples on the folio, my images are all the same dimensions. That makes it MUCH EASIER to tile them.
Obviously, sometimes you lot'll have images of all dissimilar dimensions, in which case you can't use width. The imperfect solution I've found is to change width to pinnacle and then specify acme with a fixed number of ems. Like so:
<img src="imageLocation" mode="bladder: left; height: 15em; margin-right: 1%; margin-bottom: 0.5em;">
Repeat that for each image in the gallery, then, equally usual, end the gallery with <p manner="clear: both;"> to plow off side-by-side tiling.
Ems are proportional to the vertical size of the page, then they'll grow and shrink with screen size. If all your images are the same number of ems tall, they'll be the aforementioned height relative to each other.
Unfortunately, I've had trouble making this work with captions.
© 2011 Ellen Brundige
Guestbook—Cheers for Dropping Past
Verniece Jackson on May 27, 2018:
She really did her thing with this article. She explained it so well in particular. Other people explain it and it comes across so disruptive. I really wish I could observe her on social media or through electronic mail. Does anyone know how to go far contact with her. I am new to html merely I know a trivial something something. I have been realizing my dear for coding. Lol. It's so relaxing and challenging but fun at the same time. Lol. I notice I tend to like things that I have to kind of figure out and create
JaySco on September 14, 2017:
Thanks very much!! This was super helpful!!
Chanel B on Baronial 18, 2017:
Crawly in depth caption. This helped me edited my WordPress account. Thanks!
Muhammad Jahangir on June 08, 2017:
Thank you so much for your valuable info, it really helped me alot
Bharat on February 01, 2017:
Very good explanation.
Give thanks you very much.
Sanjith on December 30, 2016:
Useful section
ahappyperson on November 14, 2016:
give thanks yous sooo much, this is the only website that really explains how to do this- y'all just saved me from failing my cess. My pictures won't work though- I've tried most everything-moving them to the same folder, writing the path,trying different pictures, etc. One picture worked then it just stopped again. Please help!
jodi seymour on November 07, 2016:
My pictures keeping coming out of the lesser of my text box on tumblr. Is there any way that you would be able to help with that?
Zoe on November 03, 2016:
So, so helpful!!! Thank you :-)
jennefer23stough on September 08, 2016:
Informative mail - I loved the info ! Does anyone know if my company can get access to a fillable DoL LM-3 example to use ?
leanna1lauber@protonmail.com on September 08, 2016:
Informative mail - I loved the info ! Does anyone know if my company can get access to a fillable DoL LM-3 instance to use ?
Stuart Coltman on September 08, 2016:
Thanks, been searching for ever to find a decent caption.
HannahThistle on June 12, 2016:
Thank you very much for the invaluable help. Tin can you suggest a manner to centre a pair of side by side images?
Telxperts from Australia on June 09, 2016:
Thank yous. This actually work for me.
www.telxperts.com
David Firester from New Jersey on June 07, 2016:
Thank you! This is very helpful!
Calvin from UK on June 05, 2016:
The detailing which you have mentioned related to code and other HTML domain is very much informative. This will help me in many manners while updating my blogs.
Go on sharing in detailing stuff. Worth reading..
Cheers!!
Laura on March 31, 2016:
Thanks! This was super helpful!
Ryan from Liverpool on March 23, 2016:
Just stumbled beyond this article and I must say - a very good read! Informative and Comprehensive caption - well washed!
Rodney from Canada on February 24, 2016:
Very useful information. Keen job!
Kristen on December 21, 2015:
This was easy to follow & helped And so much! Cheers!
wafaa on December 07, 2015:
Give thanks you .. it helped me .. it worked perfectly!! Really thanks
tramanh404 on November 21, 2015:
thank you. lucky when I institute it, here's what I'm looking for
JT on August 22, 2015:
This is exactly what I was looking for. Very clear and very simple read for what is a difficult task for newbies. Well done!!
Aabharan Shastri on August 11, 2015:
I think I needed this guide the nearly. I'm being diverted past html5 app evolution the most, Neither making much out of Information technology. Thanks for this comprehensive guide. It opened up my optics. I have habit of using html5 development in the desultory intervals. Hence I end up wasting a lot of my time. I feel like the guide is written for me just. Thanks allot for such a great write-up!
Gary Johnson on July 17, 2015:
Thank you very much, this has been very helpful.
Nira on February 03, 2015:
Thanks a lot for the very detailed and unproblematic explanation. Since I don´t have any experience with coding but needed to make some adjustments to my page that was very helpful ... and I learned something. ;)
Fiorenza from UK on September 22, 2014:
Glad I found this one; I will bookmark for future reference.
Soraya on September 09, 2014:
Thank you lot so much for your help, your precious communication has saved me a lot of time and energy. Great tutorial! :)
carlwherman on May 07, 2014:
A newby; going to give it a shot; wish me luck!
luisding on February 15, 2014:
2 thumbs upward for this tutorial :)
susan369 on January 22, 2014:
I was looking for this information yesterday and couldn't find it. Today, I just stumbles upon information technology through an unrelated search via Google. Go effigy! Thanks so much - this is invaluable! I was fierce my out trying to place images next to each other in one of my lenses. In the end, I went with a different solution. I'll keep your lens bookmarked for future projects!
Javed Ur Rehman from Karachi, Islamic republic of pakistan on November eleven, 2013:
This tutorial is very nice, i love to read about web evolution.
bearding on September eleven, 2013:
I do not say this often but ...OMG!!!! Thank you so much :-) you will never know how much of a time saver you are. I have been searching the spider web for days...and blessings I establish you today:-) simply ingenuous TY GG
ctrain on August 29, 2013:
I wouldn't have been able to marshal my images without your lens!
anonymous on July 11, 2013:
Thanks so much!
Rob Hemphill from Ireland on March twenty, 2013:
Your tutorials are ever first-class and so useful, cheers for the info.
anonymous on March x, 2013:
Made my twenty-four hour period thank you a lot !
vsajewel on February 28, 2013:
Thanx then much!
pauly99 lm on February 27, 2013:
Thank you lot very much for the lawmaking. Now I need to put this info into a Squidoo template.
anonymous on February eleven, 2013:
Very helpful, thank you :) I was starting to get very frustrated trying to get this to work. ahhhhhh, much better
Ellen Brundige (author) from California on February 08, 2013:
@anonymous: Yes, you can!
That's height: 70px;
with the semicolon to separate it from what's after information technology. :)
bearding on February 08, 2013:
nice job, information technology helped me a lot, just one question how do i set the height of an epitome, i have a profile that i take other users linked to but their profile pics are not however size, can i add together something like heigth: 70px later on ther width: 180px;
persistance lm on February 07, 2013:
Thanks, I was looking for how to do this Multiple Epitome Photograph Gallery With Captions, and you solved my trouble.
Judith Nazarewicz from Victoria, British Columbia, Canada on January 29, 2013:
Really helpful information!
daniel-euergaious on Jan 29, 2013:
Very helpful indeed!, So helpful, I've bookmarked this! Thanks for this resources!
Daniel
john-stewartsr on January 29, 2013:
It looks a little intimidating just i certain demand information technology. I'm anxious to try it
OldCowboy on January 29, 2013:
Making images clickable links is just in time for me... thanks.
shawnleeMartin on January 29, 2013:
Thanks for the info!
Deborah Boyfriend from Rome, Italy on January 29, 2013:
first-class work - thanks!
morlandroger on January 29, 2013:
Very useful article, I often struggle to get photos to line upwards just where I want them. Thanks
DaveP2307 on January 29, 2013:
That is very helpful. But what I have been searching for. Many cheers!
anitabreeze on January 27, 2013:
I recollect I honey you lot! Thank you for this lens!
NoelSphinx from Sweden on January ten, 2013:
Thanks a mil.
patriciapeppy on Dec 16, 2012:
there seems to be some content missing from your lens. Are yous planning on replacing it. It certain was useful,this is a great resources
BestBuyGuy from Beekmantown, NY on December 14, 2012:
Excellent tutorial, very useful.
Iudit Gherghiteanu from Ozun on December fourteen, 2012:
thank you so much updating your lens for us who was not able to fix these templates afterwards the new layout crash. As i guess you updated this corking info before you fixed your lenses...
MissionBoundCre on December 03, 2012:
I sooooooo needed this. Thank You!
bztees on Dec 03, 2012:
Really, really very helpful! Cheers so much!
Short_n_Sweet on Nov thirty, 2012:
I'm thinking of trying these tricks...
Cheers...
Aquamarine18 on Nov 03, 2012:
Great lens, actually helpful information. Thanks for sharing
scottorz on October 31, 2012:
helpful lens, cheers :)
SpiritofChristmas on October 26, 2012:
This is so helpful - a great fourth dimension-saver. Cheers.
casquid on October 26, 2012:
I came directly to yous for this info. Remember seeing you making a proposition on another lens yous wrote. This is helpful for a lens beingness written today. Cheers B.
Tony Bonura from Tickfaw, Louisiana on October xi, 2012:
Cheers for the valuable tips. I will make employ of some of them.
TonyB
squid2hub on Oct 03, 2012:
Smashing lens.. thanks for the tips
GoAceNate LM on October 02, 2012:
Good tips here. I beloved the Squidoo/ html how to lenses. Keep upwards the good piece of work! Blessed.
bearding on September 19, 2012:
great helpful lens, gee I wish my brain would take all this in quicker have bookmarked so can keep on trying.
Laraine Sims from Lake Country, B.C. on September 11, 2012:
I've spent a lot of time reading this lens and, "By jove, I call back she's got it!" Thank you, this has certainly been an eye-opener for me. 590 was the key I was missing!
Angel blessings!
crafty23 on September 10, 2012:
These are nice tips! Thank you for helping people like me who are a full noob when information technology comes to coding:)
Rosyel Sawali from Manila Philippines on August 29, 2012:
Your Squidoo tutorial lenses are such smashing help! I always find myself referring back to them when I forget something. I'thousand teaching myself the utilize of these codes. Proficient thing I like learning new stuff! Thank y'all so much ^_^
Sadheeskumar on August 25, 2012:
Very useful data presented in the better style. Thanks.
dahlia369 on August 24, 2012:
Very useful info, thank you!! :)
mouse1996 lm on Baronial 23, 2012:
I dearest the side past side paradigm await. Great information to tuck abroad.
anonymous on August 16, 2012:
insert: between 3 groups of the code fabricated 3 rows of iii images totalling 9 ... information technology took me hours and hours of trying to come dorsum to this page and see that ! lol next time i wont blitz; seem to salvage time only by stopping and reading lol :P
bluebatik on August 11, 2012:
I saw the side-by-side images on another lens and was getting prepare to figure the code out myself just you but relieve me a lot of fourth dimension and frustration. Thanks!!
GrimRascal from Overlord's Castle on Baronial 10, 2012:
thanks
oooMARSooo LM on July 24, 2012:
Awesome! Thanks so much! :)
Ellen Brundige (writer) from California on July 11, 2012:
@delia-delia: Ooch, 2 columns of text are surprisingly hard to do. At that place'southward no way that I know of to define 2 column areas and have text flow naturally from the bottom of the left-hand to the superlative of the correct-hand column. (I bet at that place's a mode to do it in HTML v, only I oasis't learned it yet, and anyway I dubiety it would piece of work on Squidoo, which allows limited, old HTML only.)
One thing yous CAN do is to create two paragraphs, just like the paragraphs that enclose side-by-side images, only write text in them instead of graphics. You'll have to decide how much text should go in each of the side-by-side paragraphs. Write the left-hand paragraph first, starting with
type whatever text is in the left paw column here Type column two here.
The above should work on Squidoo, whose total column width is 590 pixels (290 + a x pixel margin + 290). If you lot're not sure what width you're dealing with, you lot can effort setting both columns to a width of 48% and the margin to 4% (CSS takes widths in pixels, ems or %).
Delia on July 09, 2012:
Cracking information...I'm looking for a lawmaking to make ii columns of words...I have looked everywhere and tin can't seem to find information technology.
bearding on June 23, 2012:
I am so glad I plant this page! I take been wondering about how to align images side by side, and so thanks for this wonderful and clearly-explained tutorial. I think I will post a link to this on my photograph-linking lens as well. Thanks once more!!!!!!
Lemming LM on June 21, 2012:
This goes swell with my lens on how to supervene upon the lost Flickr module!
anonymous on June 18, 2012:
Very Helpful. Your stride by footstep is perfect. Thanks !
Millionairemomma on June 09, 2012:
One give-and-take: amazing!
John Dyhouse from United kingdom on June 07, 2012:
Love your tutorials, I somehow missed this one but it is just what I need for a new lens I am planning. -wonderfully articulate instructions - blessed
lilblackdress lm on June 05, 2012:
Very helpful. Cheers!
bearding on June 02, 2012:
Your lenses are the most helpful on HTML codes that I take e'er seen. No 1 that I have come beyond has explained it so simply, from the basics up- which is what I have been searching for for a while at present. Thank you for taking the time to create such helpful and resourceful data!
patriciapeppy on May 28, 2012:
cheers and so much for this valuable resource
Linda Pogue from Missouri on May 27, 2012:
Helpful data. Thanks!
Fay Favored from United states on May 26, 2012:
I'g back again because I still can't become this. I'll keep coming back until I do. Thanks over again... and over again... and again...
Sharon Bellissimo from Toronto, Canada on May 25, 2012:
This is groovy stuff, thanks!
Spiderlily321 on May xv, 2012:
Smashing tips and tricks. Thank you lot for sharing this!
Pam Irie from Land of Aloha on May 13, 2012:
I'm SO EXCITED to read this helpful folio. Thank you, Thank you, Thank you! :)
tjustleft on May x, 2012:
Actually skillful explanations! Aligning images is the reason I started learning the nuts of HTML and CSS. My start attempt at a webpage was with a WYSIWYG editor. With it all I could get was columns of images. That only wasn't going to work then I striking the web to detect how to do it myself. After that I ditched wysiwyg and started using a text editor.
magictricksdotcom on May 07, 2012:
Thanks for the tips!
gatornic15 on April 09, 2012:
I've been having some trouble getting side by side images the aforementioned size since the source images are different sizes. Hopefully this volition aid me effigy it out.
cmadden on April 05, 2012:
Give thanks yous especially for "articulate: left" - I would accept made it to bed much earlier some nights if I'd establish this lens earlier now!
JoyfulReviewer on March 31, 2012:
I've been wondering how to do this. Cheers for the helpful and thorough instructions.
xmen88 on March 19, 2012:
Interesting and useful.
StaCslns on March 04, 2012:
Wow, cheers! I am going to endeavor this. I love the way you explicate things!
Quirina on February 19, 2012:
Wow, these lenses of yours are So deserving of a imperial star! Thank you for making them.
Source: https://owlcation.com/stem/how-to-align-images-side-by-side
0 Response to "Inside Out and Back Again Images of Page 5-7"
Postar um comentário